If you want to watermark photos in a small quantity to protect them from unauthorized using, it’s not a problem to add watermarks manually with a couple of images using almost any image editor. However, if you would love to add watermarks to tens, hundreds or thousands of photos that require an identical edit, it is very time-consuming to add watermarks to them one by one.
In this article I’ll share you a quick tip of how to watermark photos in bulk with Watermark Plus, a powerful watermark maker on Mac OS X that lets photographers, web designers, business people, and families add watermark, resize and rename numerous photos in batch quickly and efficiently. Still don’t know how to watermark photos? Here we go.

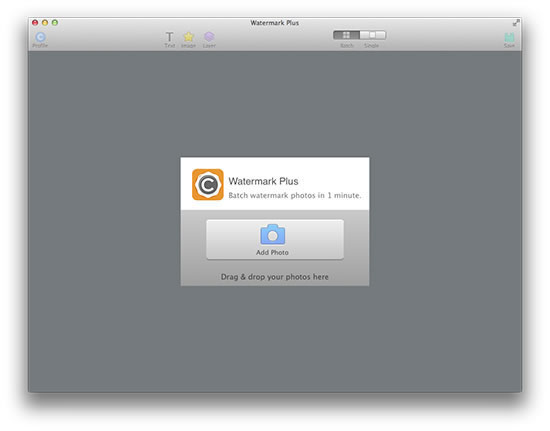
Open Watermark Plus and you will see a window for adding photos. Here you can simply click Add Photo button at the center of the screen to add as many photos as you want. Alternatively, you have the quick option to easily drag and drop your photos to the watermark maker.
When comes to design a watermark for your photos, Watermark Plus offers you three ways: text watermark, image watermark, or mixed one (text plus image watermark). Therefore, you are free to consider a text watermark, import your own image as watermark or design a unique watermark that mixes the text and image. Just choose the way that meets your needs.
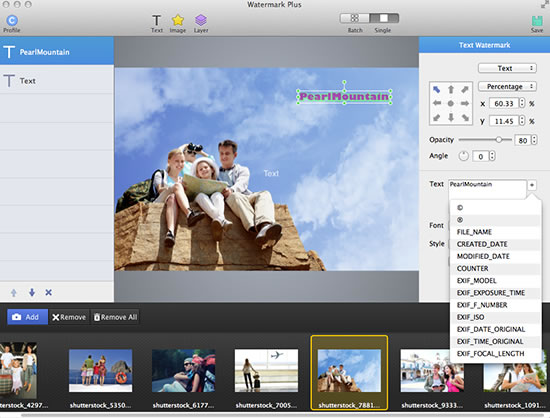
Easily click Text button at the top toolbar to add a text to your photos. Then choose a watermark style from the two options of Text and Script. You can freely adjust the text position, opacity, angle, font and its style. Besides, Watermark Plus can easily handle other info of your photos such as FILE_NAME, CREATED_DATE, MODIFIED_DATE, COUNTER, EXIF_MODLE, etc.
Click Image button beside the Text button at the top tool bar to add image watermark to your photos. You are able to add your own image as watermark by clicking Choose from Finder as well as add some image watermarks from the ones built in the watermark maker. The position, opacity and angle of the image watermark are obviously completely up to you.

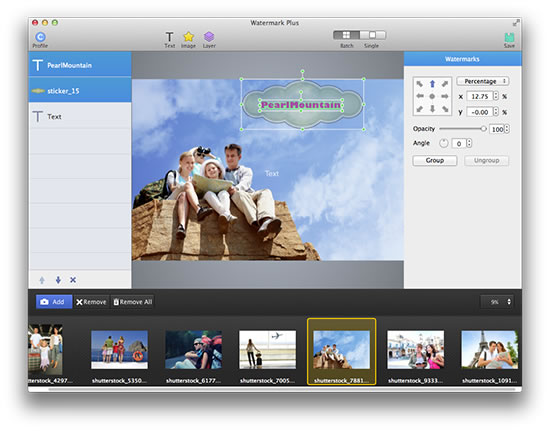
If you are going to add a mixed watermark to your photos, you may always have the problem to let the mixed watermarks on all landscape photos and portrait photos of different sizes look always the same. Don’t worry. Watermark Plus makes it possible.
Click Layer button and adjust the layers of text watermark and image watermark. And move them to adjust their position to make it fit best. Then select both of the text watermark and image watermark. Click Group to lock the mixed watermarks into one. Then, put the two-in-one watermark to a specific place you want.
Once the watermark is finished, switch each photo in the photo list below the window to see the results on each photo. If a watermark on one of the photos needs to be remade, just switch to Single mode to adjust it only for that photo, keeping watermarks on other photos unchanged.
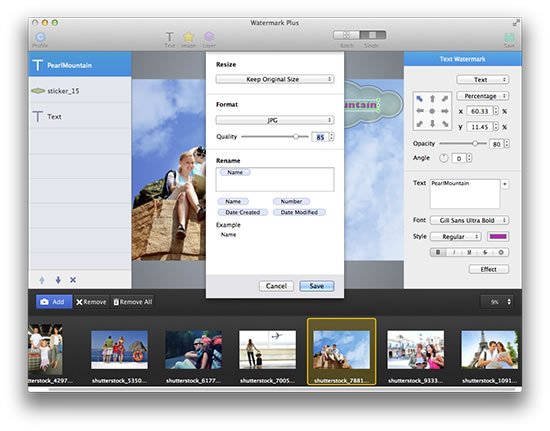
Since the watermarks look perfect on each photo, it’s time the export. Click Save to set the output size, format, quality and name of the watermarked photos. If you use a watermark often, save it as Profile for future use.
Still don’t find a way to deal with hundreds of photos for potential copyright protection? An easy to use watermark maker to watermark photos in group may help you much. Go ahead to try it out right now.
© Copyright PearlMountain. All Rights Reserved.